develop free website
Piano Nanny - Free Piano Lessons
Advanced Studies

Lesson 4 - Section 1

The Form of a Song – Part II

Welcome to Lesson Number 4. It is good to see you here. If you’ve come all the way through this online course, you have come a long way and I’m real proud of you. Good Job! Let’s continue with learning more about the form of a song. Okay?

By the way, how did your counting exercise go? This lesson may help clear up a few unknowns for you and make clear some odd things that you might have run into.

Another way to describe Head and Bridge is by using the letters (A) and (B) respectively.

If there are any additional sections of the song that are different than the initial Head or Bridge, these new sections are assigned additional letters such as (C), (D), etc. Some teachers use letters and numbers to describe a song’s form.

Example: (A1) (A2) (B) (B2) (A2)

We will use both, letters alone and letters with numbers, in our studies.

BTW, in Jazz, a song is often referred to as a chart. Think of sailing . . . and charting a ship's course to travel. A musical chart tells us how to travel from the beginning to the end of the song’s form. It's a map to take us on an adventure . . .

Lesson 4 - Section 2

Song Form with Intros

There is another song form section that we need to talk about. You probably ran into this form section in your counting practice. This section is called the Intro. Intro is an abbreviation for the Introduction. This section of measures is usually shorter than the Head or the Bridge and it occurs at the beginning of a song.

In my 8-measure counting example (Lesson 3 - Section 2), you heard me begin counting measures after the Intro played.

When you were practicing counting measures you may have heard some Intros that confused your counting of 8 bars. The Intro is usually 4 to 8 bars long and most commonly based on the last 4 or 8 bars of a song.

Do not confuse the Intro with the Head. The Head is always the main melody line of a song. The Head is usually the first notes of a song written by a composer and the rest of the song is constructed around the Head.

Let’s look at some common forms with and without an Intro.

Form without Intro

(A) (A) (B) (A)

Form with Intro

(Intro) (A) (A) (B) (A)

It should be noted that when a song is in the form (A) (A) (B) (A), the first two (A) usually have slightly different endings for the last few measures in each section. This is not always true, but it is a common enough form that we should learn about it. In this case the form would look like:

(A1) (A2) (B) (A2)

Lesson 4 - Section 3

Sections of a Song

Listen to the mp3 audio examples below to help you understand the differences in form sections (A1) and (A2). The name of this song is “Five Foot Two, Eyes Of Blue” words by Sam Lewis and Joe Young. Music by Ray Henderson.

The ending (A3), which is the last time through (A), and the (Intro), are included so you can study the complete form of this song:
(A1)


(A2


(B


(A3


(Intro


In writing a song, or as said in the world of Jazz charting a song, the composer might use a short-hand method of endings to save time, manuscript, and to let the player know that they are about to play the same section twice, but with a slightly different ending.

Let’s look at the next section to see how this is done.

Lesson 4 - Section 4

Endings for a Song

Space Saving Method for Endings

If the Head (A) of a song has two simliar versions, (A1) and (A2), and all you want to do is inform the player of this song about measures that are different, you can use the method displayed in the image for this section. This works only if the measures that differ are the last few mesures of an 8-bar or 16-bar phrase.

A musician would play (A) one time and use the 1. ending, then return to the beginning and play (A) a second time, but use the 2. ending this next time through. And after playing the 2. ending, the song continues on to (B).

So the form of this song above would be: (A1) (A2) (B)

Another method of endings used by the composer is the use of sign and coda. Look at the example in the next section to see how the use of sign and coda look on the staff.

Lesson 4 - Section 5

Coda and Sign

More Chart Navigation
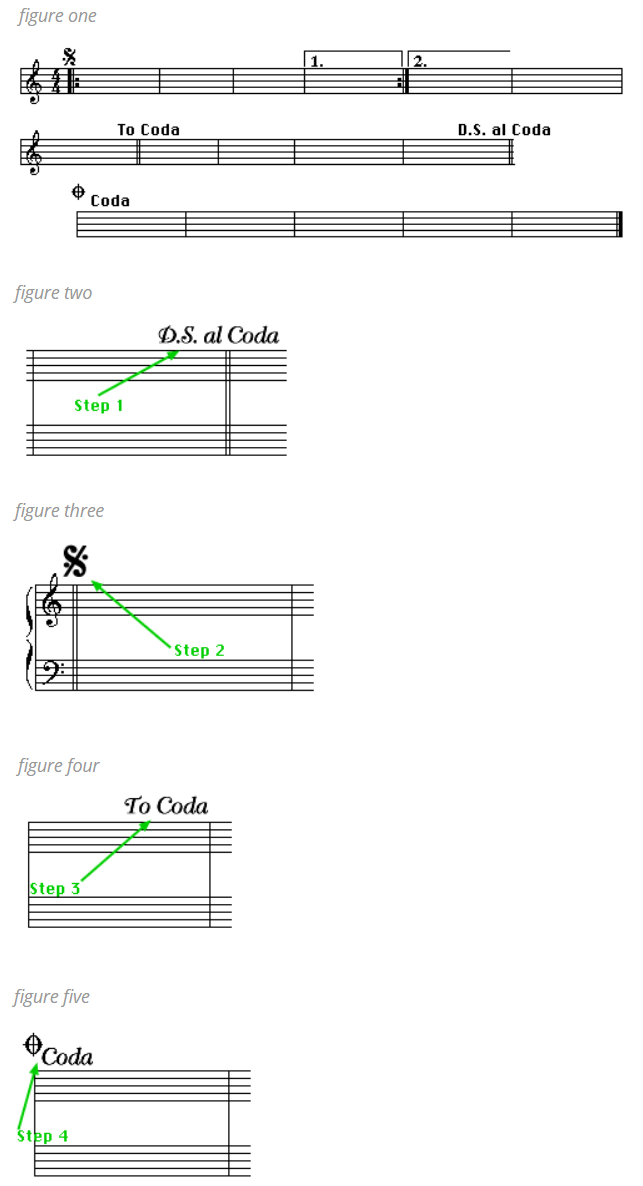
Step 1

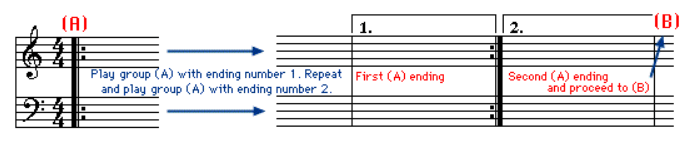
In figure one displayed in the image for this section, a player would play through the entire song including the 1st and 2nd endings, until they see a notation on the staff that looks like figure two. This is the D.S. al Coda.

Step 2

When they reach the D.S. al Coda bar, they go back to the notation on the staff found earlier in the song, that looks like figure three and continue playing the song, including the 1st and 2nd endings, again. Figure three is the Sign.

Step 3

They continue playing the song from the Sign until they reach the notation on the staff that looks like figure four. This is the To Coda marking.

Step 4

When they reach the To Coda marking, they look for the last section of the song form, which will be marked with notation like figure five. This is the Coda. Then, they play the remainder of the song that is shown in the Coda section.

This space-saving method for endings and repeats can be confusing, but it will become easier as you become accustomed to using them. It is better to use this method than having to turn many more pages of music while trying to play a song.

In Lesson Five we will use what we have learned here and how to apply it even more for performance purposes. Good job! You have done well today. See you in Lesson Five . . .

© The Art Department - All Rights Reserved - Privacy Policy