simple web templates
Piano Nanny - Free Piano Lessons
Starter Studies

Lesson 8 - Section 1

Staff and Keyboard


Well it’s Show Time!

In this lesson we are going to put it all together. Don’t panic!. We will go slow and explain fully.


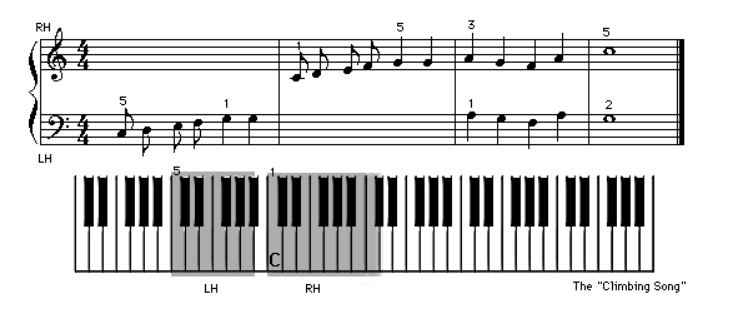
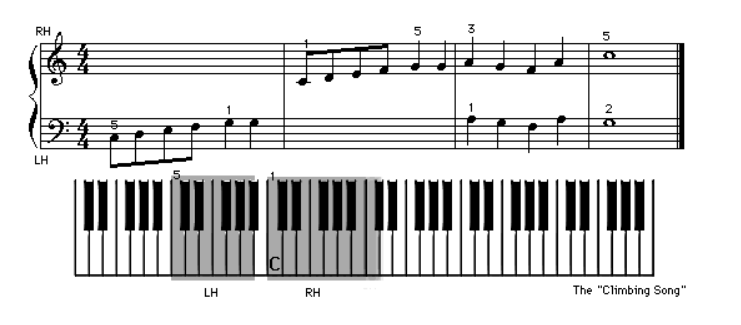
Look at the staff in the image for this section. You will be playing with your left hand first in measure number 1. In measure number 2, you will be playing with your right hand. Then in measure 3 you will be playing with both hands together. Finally, in measure 4 you will be ending with both hands together.

Play the mp3 audio file under the image to hear how this song sounds. The player is set to loop so you can just let it play for few minutes until the song becomes familiar to you.

BTW, the name of this song is the “Climbing Song.” I wrote it . . . so don’t laugh . . . *grin*.

Place the 5 th finger of your left hand on low C of your keyboard. Low C is 7 white keys below (to the left of) middle C. Look at the keyboard above to help you find low C. It is marked with a number 5.

Now, place the number 1 finger (your thumb) of your right hand on middle C. It is marked as always and also with a number 1. Your hands are now in the correct starting position to play this song.

Notice in measure 3 that you will need to adjust both hands to the right to change to new finger positions. The number 1 finger (thumb) of you left hand will start on note “A” below middle C. The number 3 finger of your right hand will start on note “A” above middle C. The whole purpose of finger positioning is so you don’t run out of fingers when you get to measure number 4. If you try and keep your fingers in the position as when you started playing the song (you can see by trying it yourself), that you would run into problems trying to play measure numbers 3 and 4.

If you haven’t already done so, push the stop button on the mp3 audio file player.

You have heard how the song is played, now give it a try for yourself. It’s time to go it alone.

It is fine to stop and listen to the song again if you need to.

Continue to play the song for 5-10 minutes. This will help you to continue to develop LH and RH coordination.

Lesson 8 - Section 2

Staff and Keyboard

Beams

Congratulations! You are in the BIG leagues now, you are using both hands to play the piano. You’ve also learned the importance of finger placement. Now let’s take a look at some more interesting ways in which music is written to help the player play.


Look at the “Climbing Song” above. Do you notice anything different? It is the same song and will be played the same way, but as you can see there are some new looking notes on the staff. Look at the eighth notes and you will see that they are all connected now. This is a helping aid for the player of the song. “That’s You.” A composer will group notes per beat by adding a Beam to them. This beam groups notes together for each beat. And, it is also used to help keep track of the first half of a measure and the last half of a measure.

You will see eighth and sixteenth notes grouped together with a Beam as a general rule. This also helps the notes on the staff to be less confusing when there are lots of eighth notes or sixteenth notes used in a single measure.

It is time now for you to use your music notebook with the blank staff paper. If you have misplaced it, you can go back to Lesson 4 and then return here.

Copy what you see on the staff in the image for this section into your notebook and label it the “Climbing Song.” The correct way to draw notes is to first make the circle part of the note on a line or a space. Then draw the stem. Then add the Flag or Beam as needed. When you are done, go to the next paragraph.

A Quick Note about Stems and Beams

As you have learned there are five lines drawn for either the Bass Clef or the Treble Clef on the Staff. Look at the middle (3rd) line in either clef. If a note falls below this line, then the stem is drawn pointing upward. If a note falls on or above this line, then the stem is drawn pointing downward. Look back at Section 1 of this lesson, before beams were added to the eighth notes and you will be able to see this more clearly. 

Lesson 8 - Section 3

Staff and Keyboard

Rests

Now it is time to rest. I don’t mean you rest. I mean it is time to learn about Rests. Look at the “Climbing Song ” again.


There used to be blank measures where no notes were written and now something new occupies the blank measure. This is called a Whole Note Rest.

In the next lesson we will go into Rests in more detail. Until then, it has been a pleasure teaching you. To you I say, “GOOOOD JOB.” Well Done. Give yourself another one of those big teddy bear hugs. You deserve it.

If someone were to ask you now, “Do you play the piano?” you could now officially say, “Yes, yes I do play.”


© The Art Department - All Rights Reserved - Privacy Policy